I distinctly remember being asked early in my blogging (circa 2010), if I was going to write a book. My response was to laugh, “Are you kidding? Blog post size is just my speed right now!” But blog post after blog post and… five years later, I found I’d created a significant body of work. Very likely, so have you. Turn your amazing content into a completely new product – an eBook! It is much easier to turn blog posts into an eBook than you might imagine.

How To Turn Blog Posts Into An eBook
Don’t be daunted by the thought of turning your blog posts into a book. I’m going to walk you step by step through the process I used to create my first eBook.
How to find content for your eBook – inside your blog!
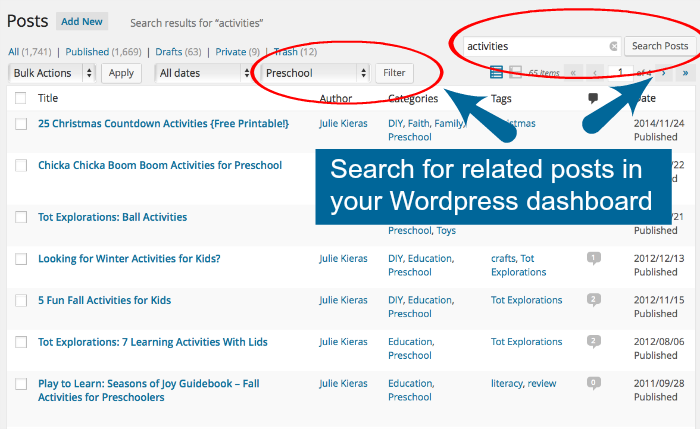
First, browse the posts in your WordPress dashboard.
In your body of work (namely, your blog!), you’ll notice recurring themes. Perhaps you write frequently about…
- parenting challenging children
- tips for new photographers
- getting deals while traveling
These would all make great eBook beginnings. To find these recurring themes:
- Filter posts by category to see how many you have filed under certain categories.
- Or use the search feature to look for keywords (toddler activities, for me), and see which posts appear.

When I searched my posts, I saw I’d written over 130 posts on natural or tech-free play for kids. An obvious “recurring theme” for me!
Next, find your most popular posts.
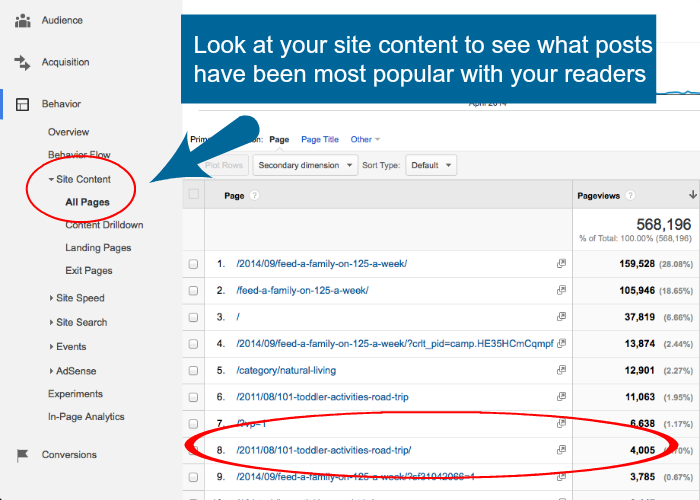
- Google Analytics identifies which posts get the most traffic over a period of time.
- Or, sort posts by number of comments to see which have high reader interaction.

I discovered my most popular posts – always in the top ten – are my series on toddler activities, which lines up with the high volume of posts I’ve written on the topic. So I chose to create an eBook detailing 101 Tech-Free Toddler Activities.
Find a collection of 5-12 posts on a theme you’re passionate about, and you have the beginnings of your eBook.
How do I turn these blog posts into an eBook?
There’s many routes to creating eBooks, from expensive software, to hiring someone to handle the creation and design of your book. But it’s easy (and free!) to create your own eBook and have full creative control.
1. Collect your post content.
Copy and paste text from the selected posts to a document in Microsoft Word or a Google Docs. You’ll need to reinsert images later, so remember to right-click and save images into a folder as you go.
2. Create a table of contents.
Use post titles to create your table of contents, then organize these “chapters” for easy reading flow. Creating a table of contents first will show you if you covered all the points necessary for the book. You may discover you need to write an extra chapter or section to fill in details or cover all the ground in your topic.
3. Add content to your eBook.
Content you will need will probably include:
- Cover / Title Page
- Table of Contents with page numbers
- Purpose
- How to use this book
- What you’ll find in this book
- About the Author
- Resources & links
- Contact information
- Copyright information
- Disclosures (if needed)
- Footnotes/sources (if needed)
4. Revise and edit for readability and accuracy.
It’s the part of writing we love to hate. But think of it like putting the finishing touches on a delicious cake. Carefully read each section start to finish. Because the content was originally written as blog posts over time, you may need to tweak wording so it makes sense.
Here are some revisions I had to make in my eBook:
- Removing time references such as “yesterday,” “last year,” and “stay tuned for tomorrow’s post on…”
- Removing rambling phrases or irrelevant information – usually fine in a blog post it will be distracting in a book
- Transitions from one section to the next (I used famous quotation callouts)
- Updating outbound links that are broken or out-of-date
- Formatting text – numbering, spacing, headings and subheadings
- Adding bonus materials like recipes, tips, and printables
- Adding design elements like borders, images, section breaks, or quotation call outs
Don’t forget spelling and grammar check. Have a friend read a copy to help find those pesky typographical errors.
How do I design my eBook?
I used Microsoft Word to add images, quotation call outs, colored headings, and footer text. For more elaborate details, transfer text and images to Microsoft Publisher or PowerPoint, which will give you more freedom over design elements.
To design a cover, I created a cover graphic in PicMonkey. All you really need is a striking image, your title, tagline, and author name. If design is not your domain, an inexpensive route is to hire out to a VA or a place like fiverr.com.
How do I format my eBook?
I prefer to create PDF files of my eBook, to make it easier to read, share, and discourage copying of material. Here are three ways to convert a file to a PDF:
- Adobe Acrobat software converts files from most programs. Get a free trial of Adobe Acrobat XI.
- Free PDF creators like PrimoPDF will also convert files, but have more limited options, and may not leave hyperlinks intact.
- Upload your file to Google Docs. Then download the file as a PDF. The hyperlinks should remain clickable.
How do I publish my eBook?
Congratulations! You just turned your blog posts into an eBook! Now let’s deliver that hot-off-the-press book into the hands of your eager readers!
There are four major ways to deliver your eBook.
- Self-hosted on your website – upload the PDF file into your WordPress media section; copy the permalink on the right hand side. Upload your cover graphic separately. Insert your graphic into a blog post, page, or sidebar, and link it to the permalink for your eBook file. Readers will click and the PDF file will instantly open up in your site.
- Stored on Google Drive – upload the PDF file to Google Docs. Gather the share link, and connect the link to a graphic, text, blog post, or pin it! Readers will be directed to this document when they click.
- Emailed directly to readers – create an opt-in form and let readers know how they can get your eBook for joining your mailing list. Opt-in offers are a fantastic way to reward your readers for subscribing, and the book is sent directly to their email.
- Published for sale – Sell your book via your site with PayPal, a shopping cart or online store, or through Amazon Kindle Publishing.
I chose to offer my first eBook to email subscribers. So I created a landing page with all the eBook information and the opt-in form to sign up for my email list. I also placed a graphic in my sidebar pointing people to me eBook offer.
From choosing and collecting content, to revising, designing, and formatting, I went from blog to book in less than ten work hours. You CAN easily self-publish your work and turn blog posts into an eBook!
Now, I encourage you, look through your blog to find content for your up-and-coming eBook! Leave a note in the comments about your topic choices!
